
Guides

Your shop on KadaAI, step by step

Short, plain guides for owners and cashiers, from your first sign-in to closing the day. Budget about an hour to set up a single-till shop; most of it is adding your products.

All guides

Get started

Your products

Add a product

Sizes and colours, with SKU codes and barcodes made for you.

Web admin

Receive stock

Scan a delivery in and see what’s running low.

Web admin

At the counter

Close the day

Count the drawer against expected cash.

Till and web admin

AI and settings

Ask KadaAI

Insights, the AI Assistant and restock suggestions.

AI Standard · AI Pro

Get started

Web admin

Start your free trial

There’s no sign-up form to fight with. Ask for a trial and we’ll set up your store with you.

  1. Ask for your trial

    Open the free trial page, fill in the short form and send the email it writes for you.

  2. We set up your store

    We create your store and its owner account with you, then send you your web admin address and your store code.

  3. Open your web admin

    Open the address in Chrome, Edge or another modern browser on a laptop or desktop.

  4. Sign in

    Type your name, then the PIN or password you chose, and press Sign in.
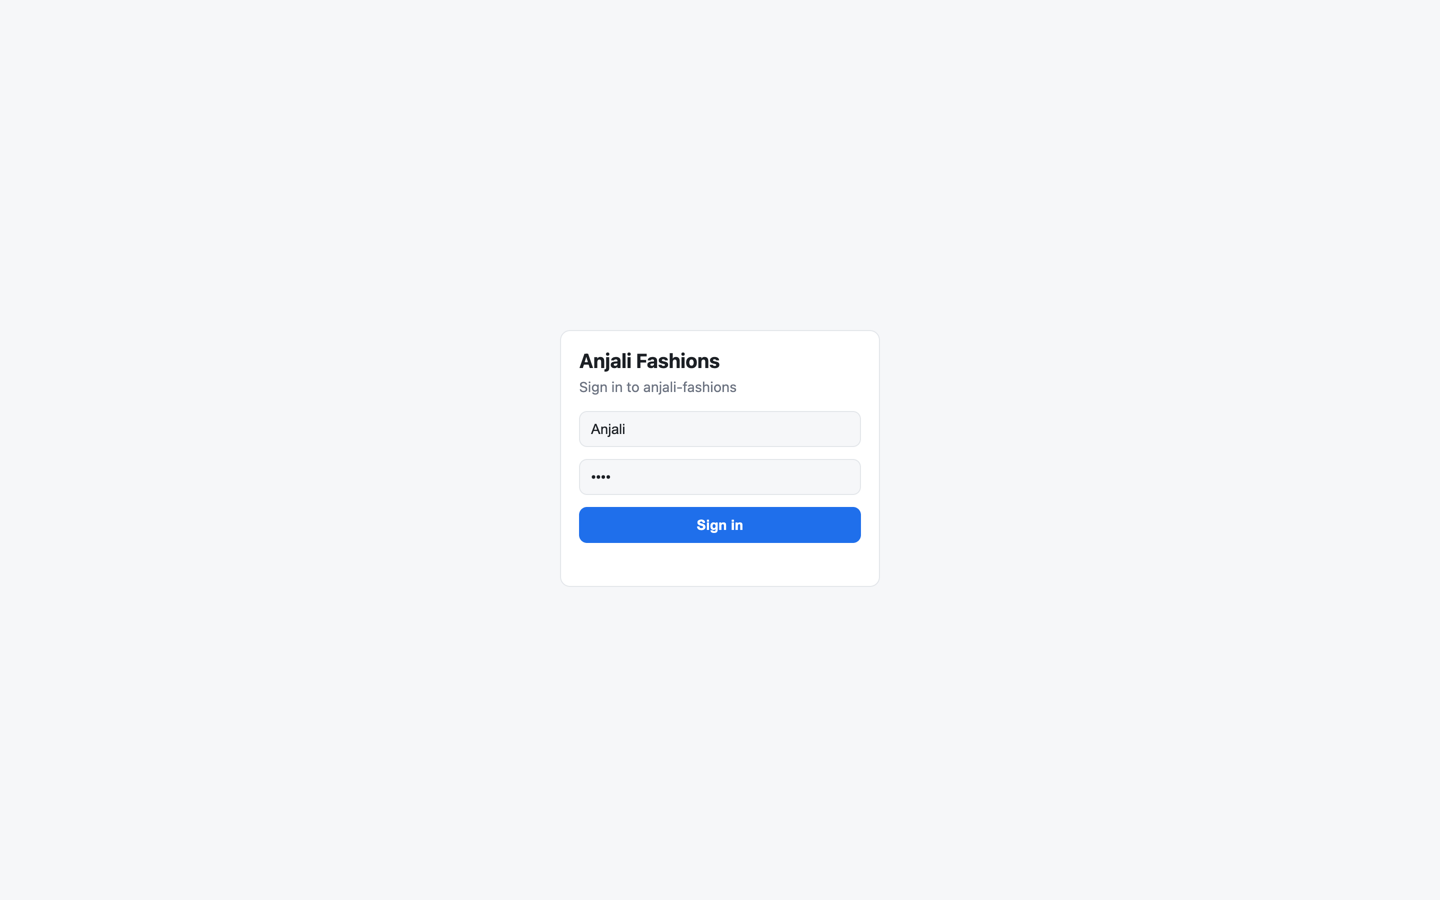
    The store sign-in page of the web admin for Anjali Fashions: a name field, a hidden PIN and a Sign in button.
    Each store has its own sign-in page.
  5. Change your PIN on day one

    Go to Settings → Users and press Reset PIN next to your name. Use at least 4 characters; 6 is safer on a shared counter.

Good to know

  • Your trial includes AI Pro, the daily backup and up to 3 tills for 30 days. No card needed.
  • Five wrong tries lock that name out for 15 minutes. Sessions last 12 hours, then you sign in again.
  • Add a second owner, such as a partner or manager, so one forgotten PIN never locks the shop out.

All guides

Web adminOwner

Set up your store and GST

Your store details print on every bill. Tax categories tell the till how much GST to charge.

  1. Open Settings

    In the web admin, choose Settings in the left menu.

  2. Fill in the store profile

    Under Store profile, enter your shop’s name, GSTIN, state code, phone and address. For Invoice prefix, your shop’s initials work well. Press Save.
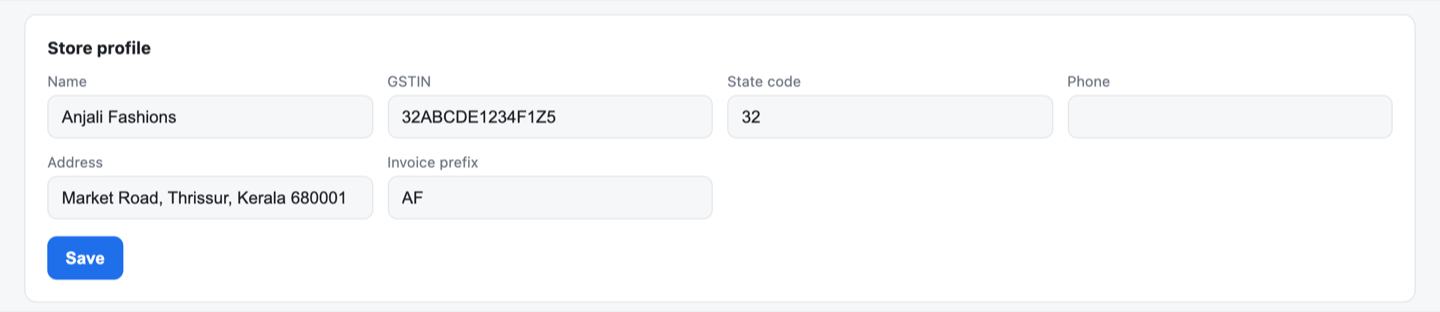
    The Store profile card in web admin settings: name Anjali Fashions, a GSTIN, state code 32, an address in Thrissur, Kerala, and invoice prefix AF, with a Save button.
    Your shop’s name, GSTIN and address print on every bill.
  3. Add a tax category

    Under GST tax categories, type a name such as Apparel and choose Flat rate or Price slab (by piece price).

  4. Set the rates

    For a flat rate, type one rate. For a price slab, type each cut-off and its rate, then the rate above the last cut-off: for apparel, up to ₹2,500 at 5% and 18% above it. Press Add category.
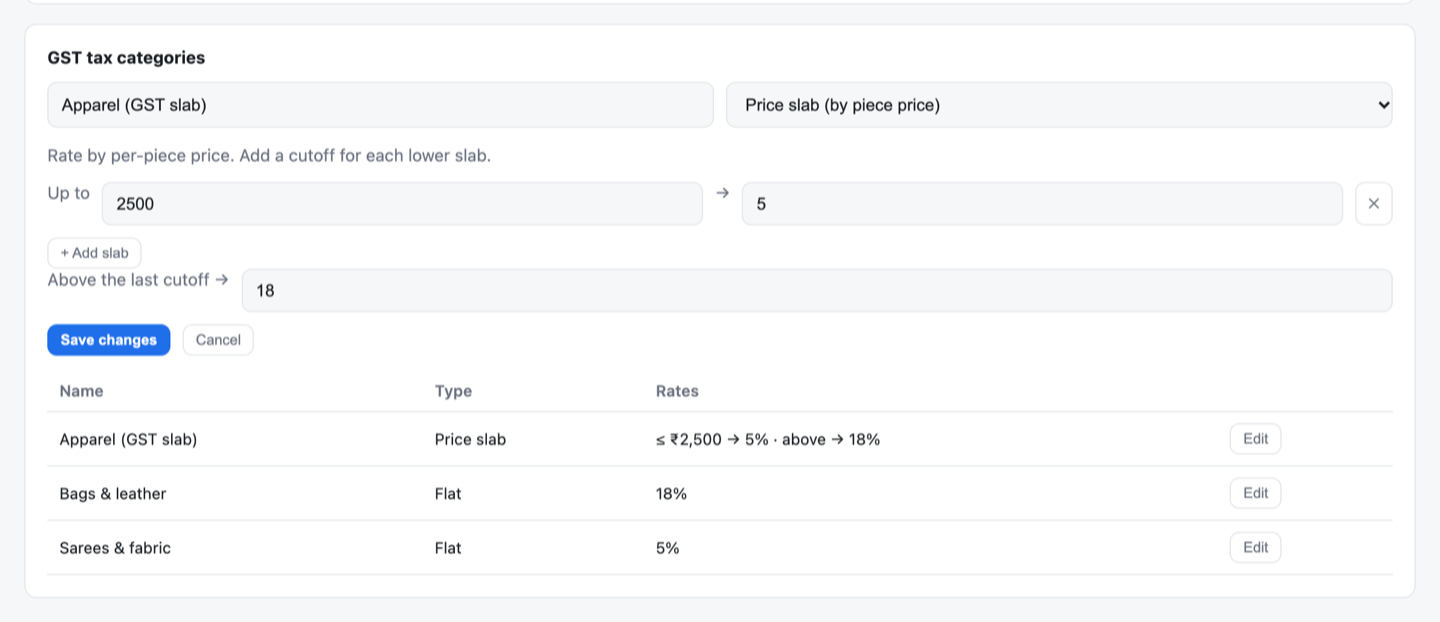
    The GST tax categories card: an Apparel price slab of 5% up to ₹2,500 and 18% above, with flat-rate categories for bags and leather at 18% and sarees and fabric at 5%.
    One price-slab category and two flat ones.
  5. Give each product its category

    In Catalogue, open a product and pick its category in the GST box. A CSV import can set it too.

Good to know

  • New Each till numbers its own bills: T1/2627/0001 on your first till, T2/2627/0001 on the second. The invoice prefix is only for the rare bill our server numbers instead.
  • The slab is chosen on each piece’s price after discounts, and a bill discount is split across the lines before GST, so taxable value and GST stay correct.
  • Prices include GST, MRP-style. We set this for your store during onboarding, so there’s nothing to switch.
  • A product with no tax category is billed without GST, so give every product one.
  • Changes reach your tills on their next sync. Tills sync every 15 seconds.

All guides

Web adminOwner

Add your staff

Give everyone their own name and PIN. Day-close then shows who rang up what.

  1. Open Settings → Users

    In the web admin, go to Settings and find the Users card.

  2. Add a user

    Type their name, choose Cashier or Owner, and set a PIN or password of at least 4 characters. Press Add user.
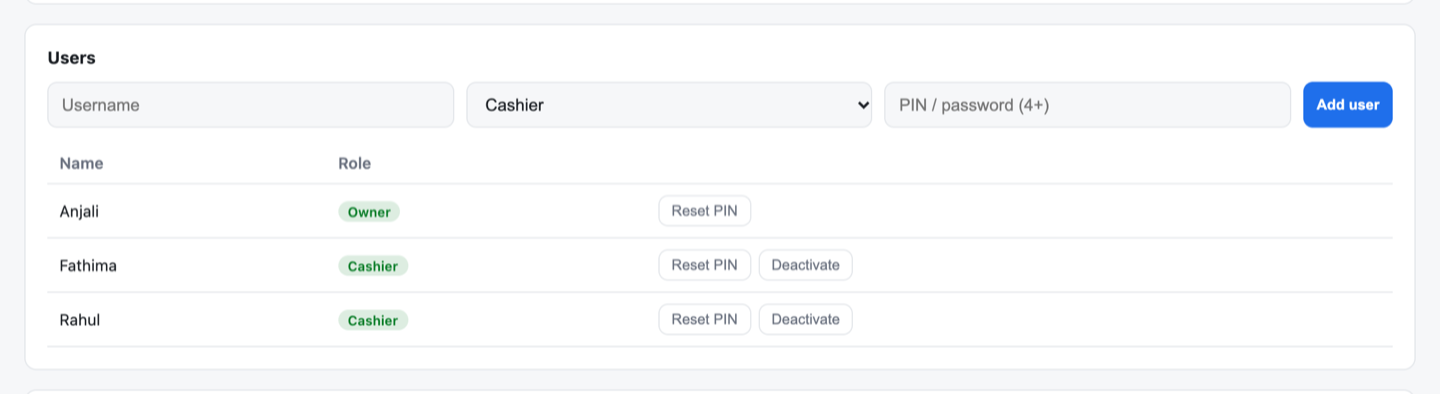
    The Users card in web admin settings: a form with username, role and PIN fields and an Add user button, above a list of one owner and two cashiers with Reset PIN and Deactivate buttons.
    Owners and cashiers, each with their own PIN.
  3. They sign in at the till

    New staff reach your tills on the next sync. At the till, they pick their name and type their PIN.

  4. Reset or deactivate

    Forgot a PIN? Press Reset PIN. Someone left? Press Deactivate.

Good to know

  • On the till, cashiers sell and take returns. Reports, store settings and pairing are for owners.
  • Sensitive till actions, like re-pairing, ask for the owner’s PIN again.
  • Make a second owner too, such as a partner or manager.

All guides

Till

Install and pair a till

Do this once for each counter. You need the till installed, an internet connection and the owner’s PIN.

  1. Install the till

    Ask for the installer on the download page (we email it to you), then run it. If Windows SmartScreen appears, choose More info, then Run anyway.

  2. Open it

    The first time, the till opens on Set up this till.

  3. Fill in the five fields

    Backend URL and Store code come with your welcome details. Name this till is where it sits, like Counter 1. Then the owner types their Owner name and Owner PIN / password to approve this till.
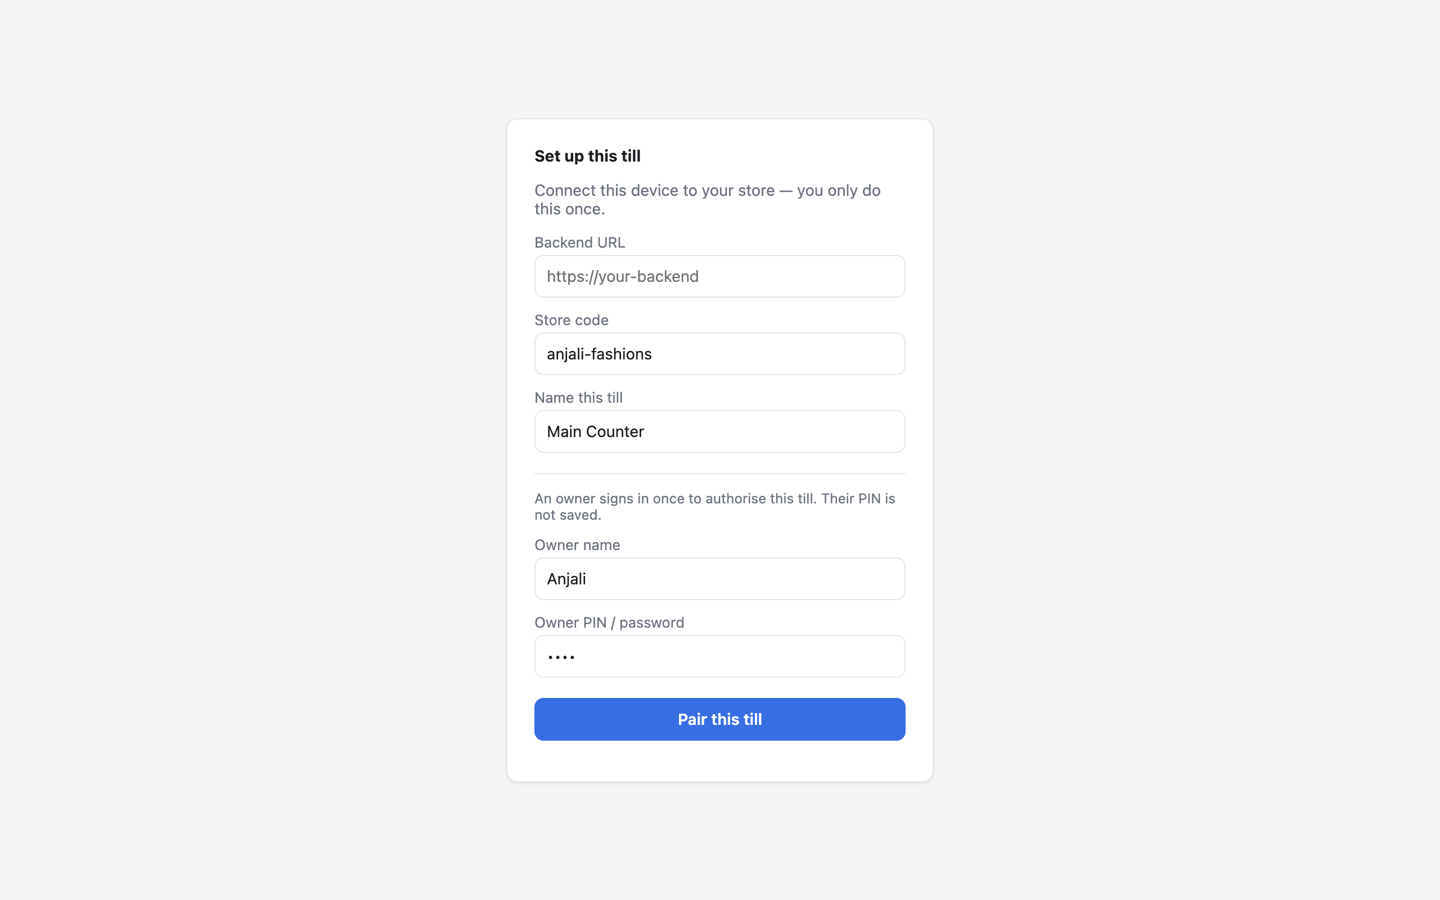
    The till’s Set up this till screen with five fields filled in: Backend URL, store code anjali-fashions, till name Main Counter, owner name Anjali and a hidden PIN, above a Pair this till button.
    The Setup screen: five fields, once per till.
  4. Press Pair this till

    The till pulls your catalogue and staff straight away.

  5. Sign in

    Pick your name under User, type your PIN and press Sign in. This works offline from now on.
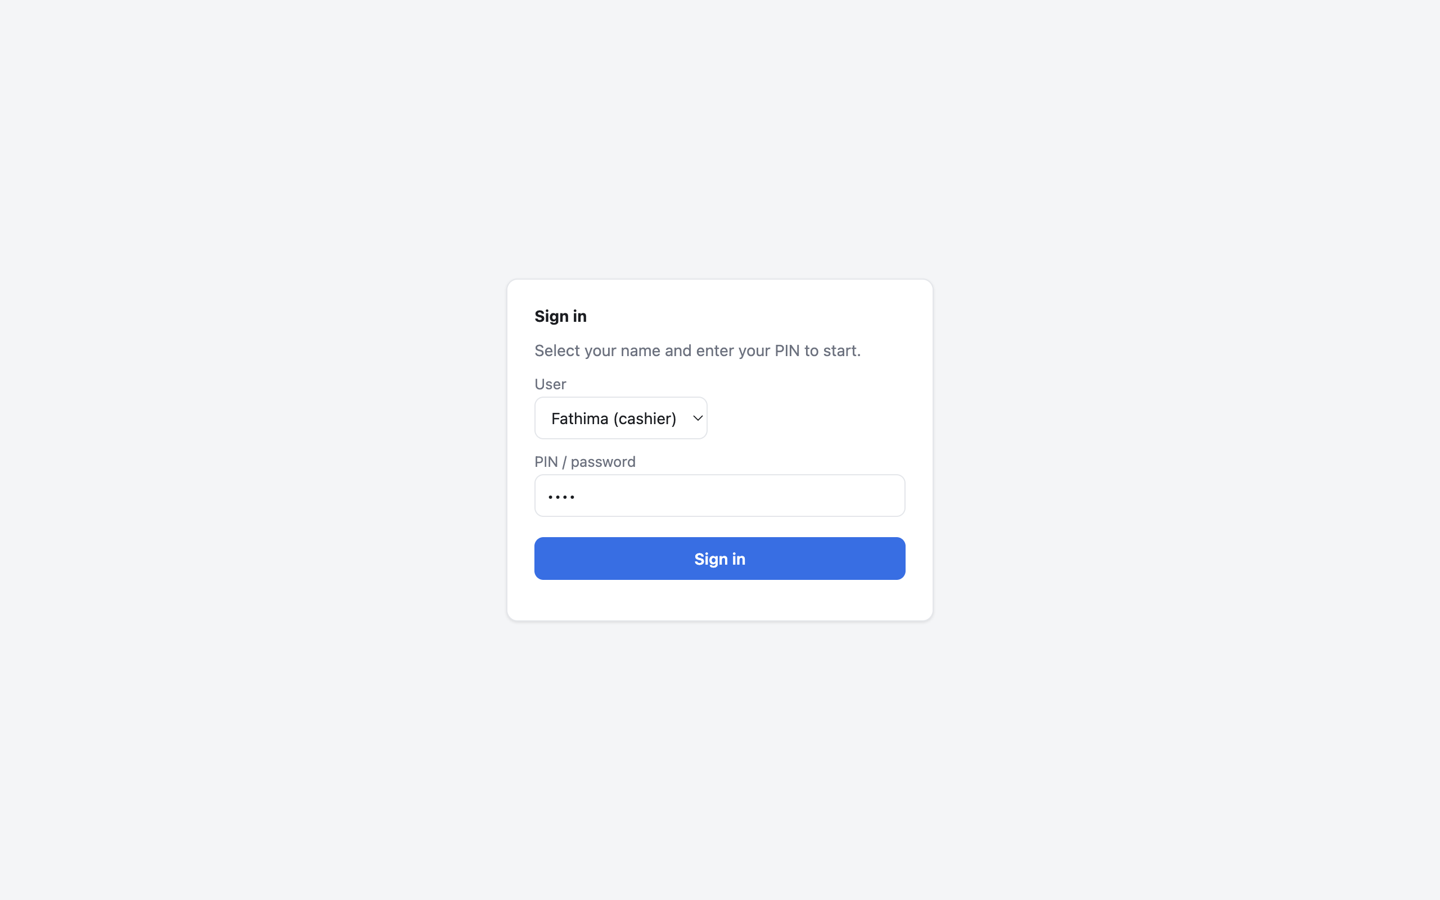
    The till’s Sign in screen: a User list showing Fathima (cashier), a PIN field and a Sign in button.
    Sign-in checks the PIN on the till itself, so it works offline.

Good to know

  • Name tills after places, not people. That’s how you’ll know which one to revoke if a PC goes missing.
  • The owner’s PIN isn’t saved on the till. The till keeps only its own device key.
  • Two counters on one PC? Several tills can run on one PC. We set this up for you during onboarding.
  • Pairing needs the internet. Billing doesn’t.

All guides

Your products

Web admin

Add a product with sizes and colours

Each size and colour is its own item, with its own price, stock and barcode.

  1. Create the product

    In Catalogue, press + Product. Type the product name and a base price, then press Create.

  2. Add a size or colour

    Under Add SKU, type the variant (for example M / Blue), the cost, the selling price and the opening quantity.

  3. Leave the barcode blank, or scan one

    Leave Barcode blank and KadaAI makes an EAN-13 barcode for you. If the item already carries the supplier’s barcode, scan it into the box. Press Add SKU.

  4. Repeat for each variant

    Every size and colour gets its own SKU code automatically.
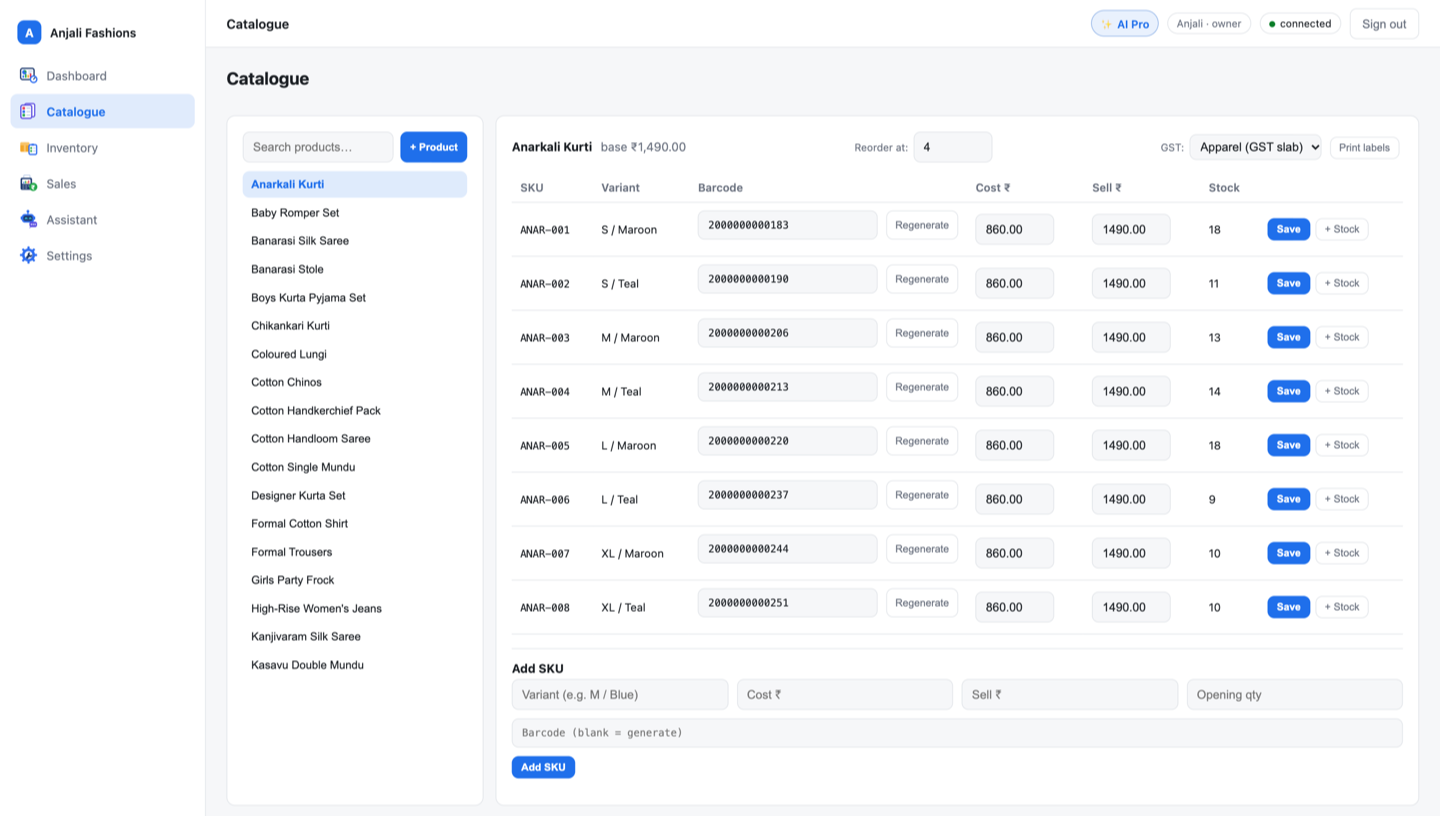
    The web admin catalogue: an Anarkali Kurti with eight variants in sizes S to XL and two colours, each with its own SKU code, EAN-13 barcode, cost, selling price and stock, and an Add SKU form below.
    One product, eight variants, every code made for you.
  5. Set GST and the reorder level

    At the top of the product, pick its tax category in GST and the stock level to reorder at in Reorder at.

Good to know

All guides

Web admin

Import products from a spreadsheet

The fastest way to load a big catalogue. One row is one size or colour.

  1. Download the template

    In Catalogue, find Bulk import and press Template. You get a CSV file with all 13 columns in the right order.

  2. One row per size or colour

    Only product_name and sell_price are required. Rows with the same product name become one product. Prices are in rupees, like 499.00.

  3. Describe the variant

    Put sizes and colours in attributes, like Size=M;Colour=Blue. Every row of a product needs the same keys.

  4. Let KadaAI make the codes

    Leave sku_code and barcode blank and they’re made for you. Fill in barcode where the supplier printed one.

  5. Validate

    Choose your file and press Validate. It checks every row, flags errors and duplicates, and changes nothing.

  6. Apply

    Fix anything flagged, validate again, then press Apply. It’s all or nothing: every row goes in, or none do.

products.csvExample
product_nameattributessell_priceopening_stockbarcode
Cotton KurtiSize=M;Colour=Blue899.0010blank
Cotton KurtiSize=L;Colour=Blue899.008blank
Silk DupattaColour=Maroon649.0058901234567890
Five of the 13 columns. The two Cotton Kurti rows become one product with two sizes; blank barcodes are made for you.

Good to know

  • tax_category must match the name of a tax category you’ve created; hsn_code prints on the GST invoice; low_stock_threshold sets the reorder level.
  • A sku_code that’s already in your catalogue updates that item instead of adding a new one.
  • Owners can import from the till too: Settings → Bulk catalogue import. It needs the internet.

All guides

Web admin

Print barcode labels

For stock without its own barcode. Print a sheet, stick the labels on, scan at the counter.

  1. Open the label picker

    After you receive stock, a Print labels for this delivery panel opens with the quantities filled in. To reprint, open the product in Catalogue and press Print labels.

  2. Set how many

    Change the number under Labels for each size and colour.
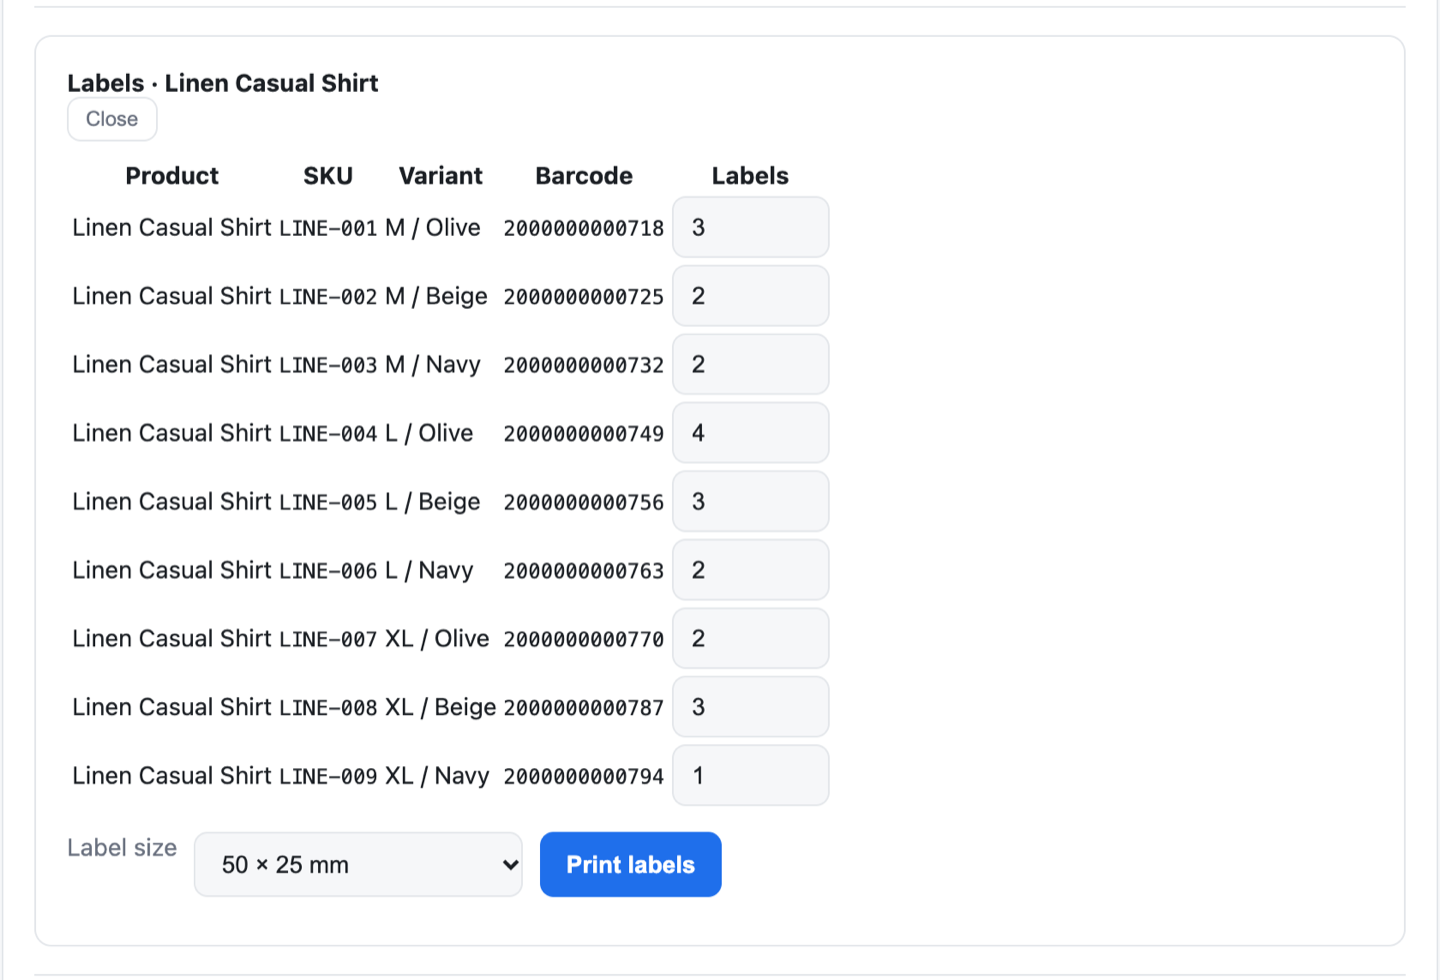
    The label picker for a linen shirt: nine sizes and colours, each with its SKU code, barcode and a number of labels, a label size of 50 × 25 mm and a Print labels button.
    Choose how many labels for each variant.
  3. Pick a label size

    Choose 38 × 25, 50 × 25 or 65 × 38 mm. KadaAI’s own barcodes fit well on 50 × 25; long supplier codes need 65 × 38.

  4. Print

    Press Print labels. A print window opens with the sheet. If your browser asks, allow pop-ups for your admin.
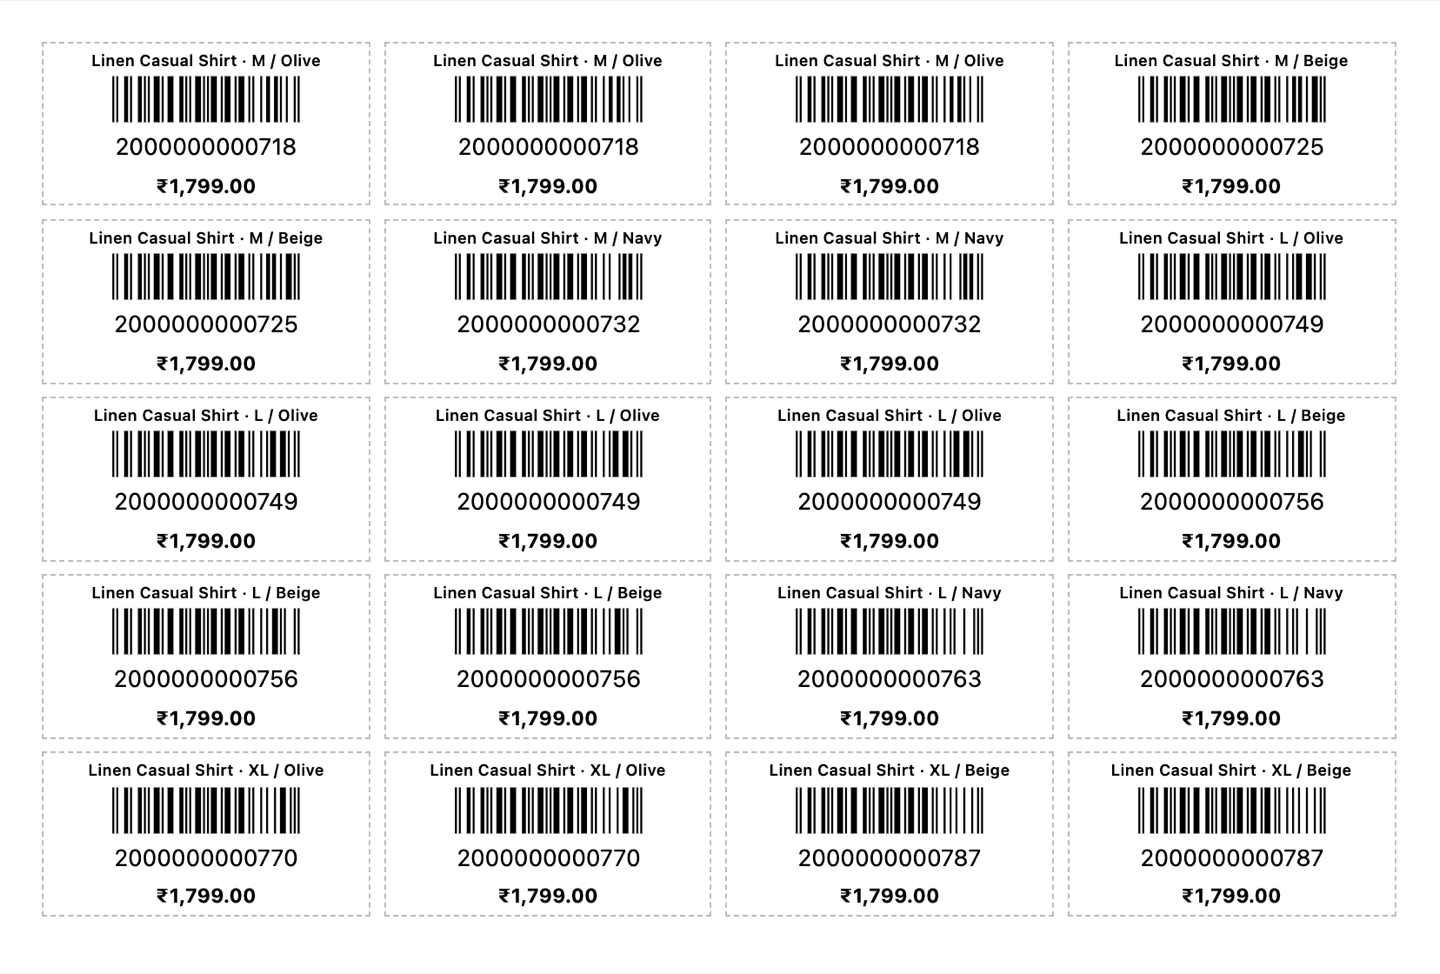
    A printed sheet of barcode labels, each showing the product name, size and colour, an EAN-13 barcode and the price.
    Each label shows the item, size, colour and price.

Good to know

  • Print one sheet to PDF first and check your printer isn’t scaling the page. Scaled bars are harder to scan.
  • The picker warns you when a code won’t fit the label size you chose.

All guides

Web admin

Receive stock and watch low stock

Book in a whole delivery in one go, with your scanner.

  1. Open Inventory

    In the web admin, choose Inventory and find Receive stock.

  2. Scan each item

    Scan the barcode, or type the SKU code and press Enter. No barcode? Pick it with Select product and Variant, then press Add.

  3. Set quantities

    Type how many arrived in Receive qty. Add the supplier and their invoice number if you like.
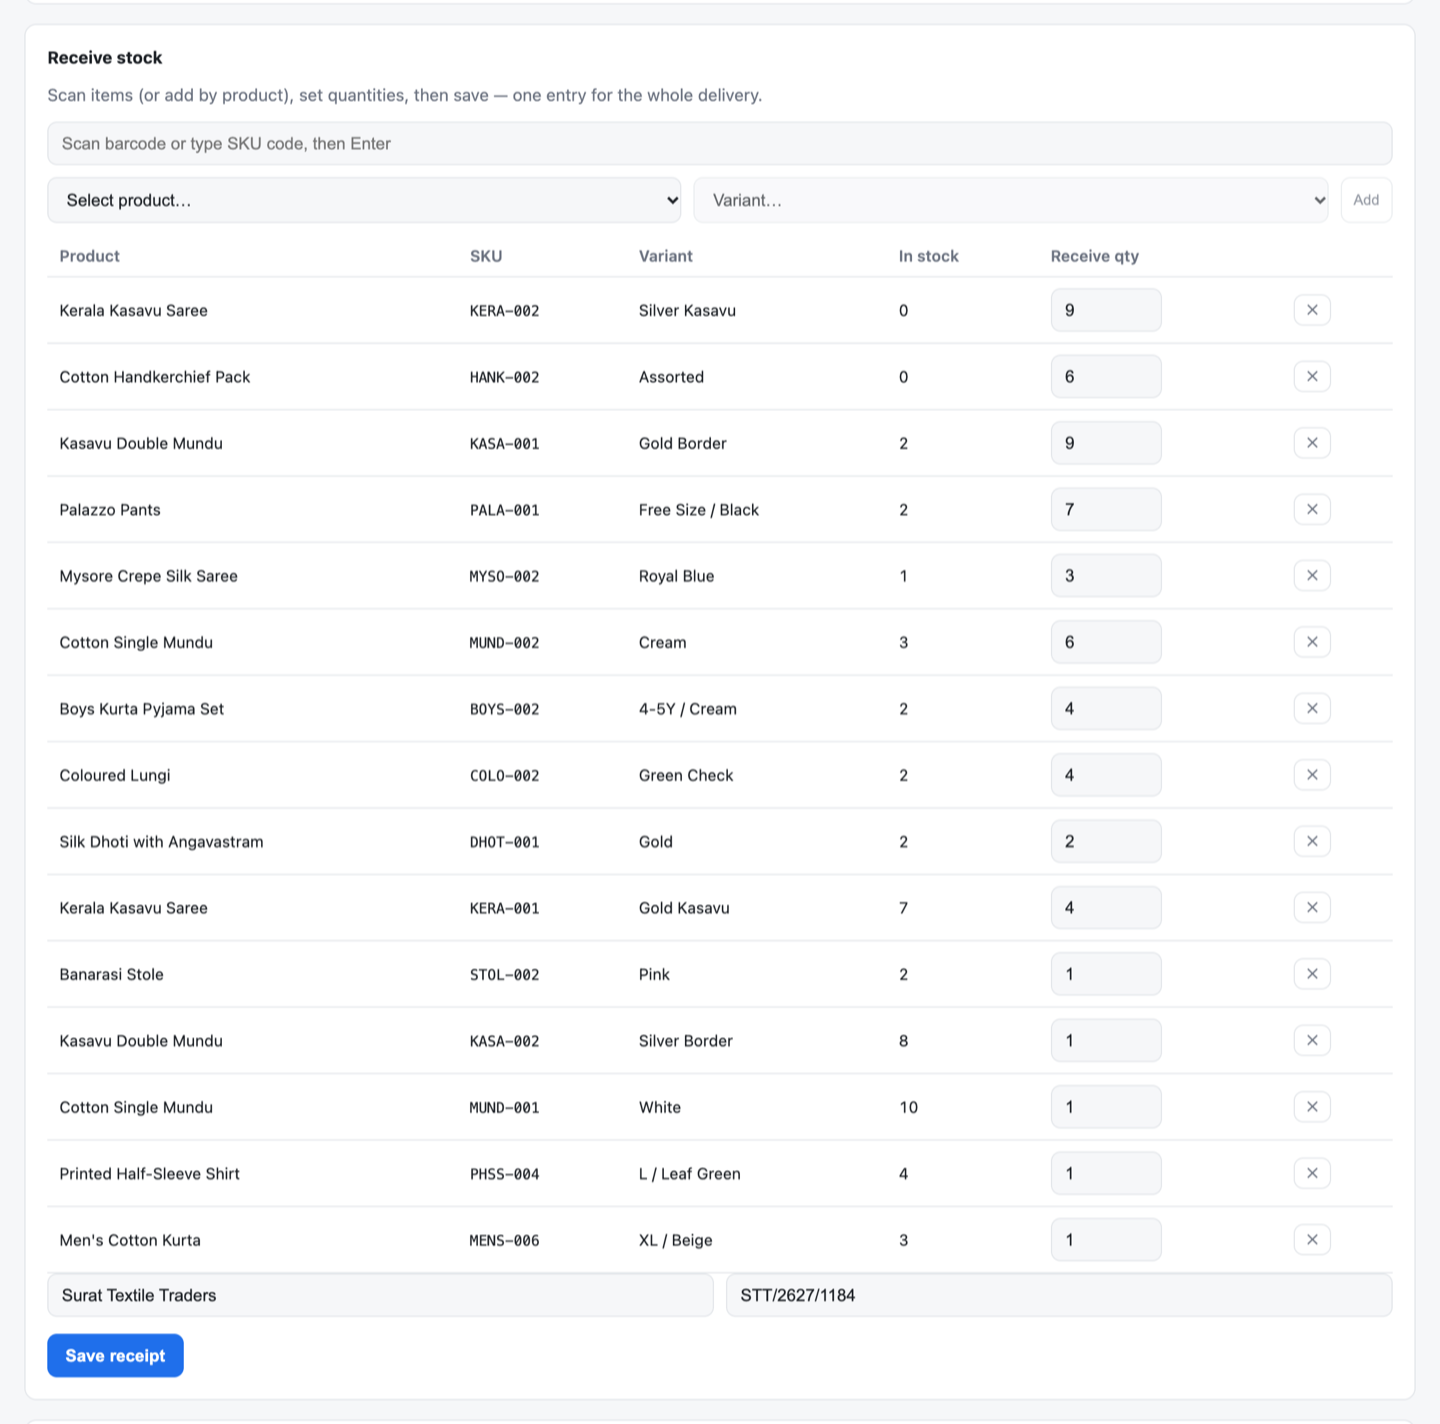
    The Receive stock card: a scan box, a product and variant picker, and a list of items from a delivery with the stock in hand and the quantity received for each.
    One entry for the whole delivery.
  4. Save the receipt

    Press Save receipt. Stock goes up, and the label panel opens for that delivery.

  5. Check low stock

    Low stock lists every item at or below its reorder level. To correct a miscount, type a ± qty and a reason, then press Apply.
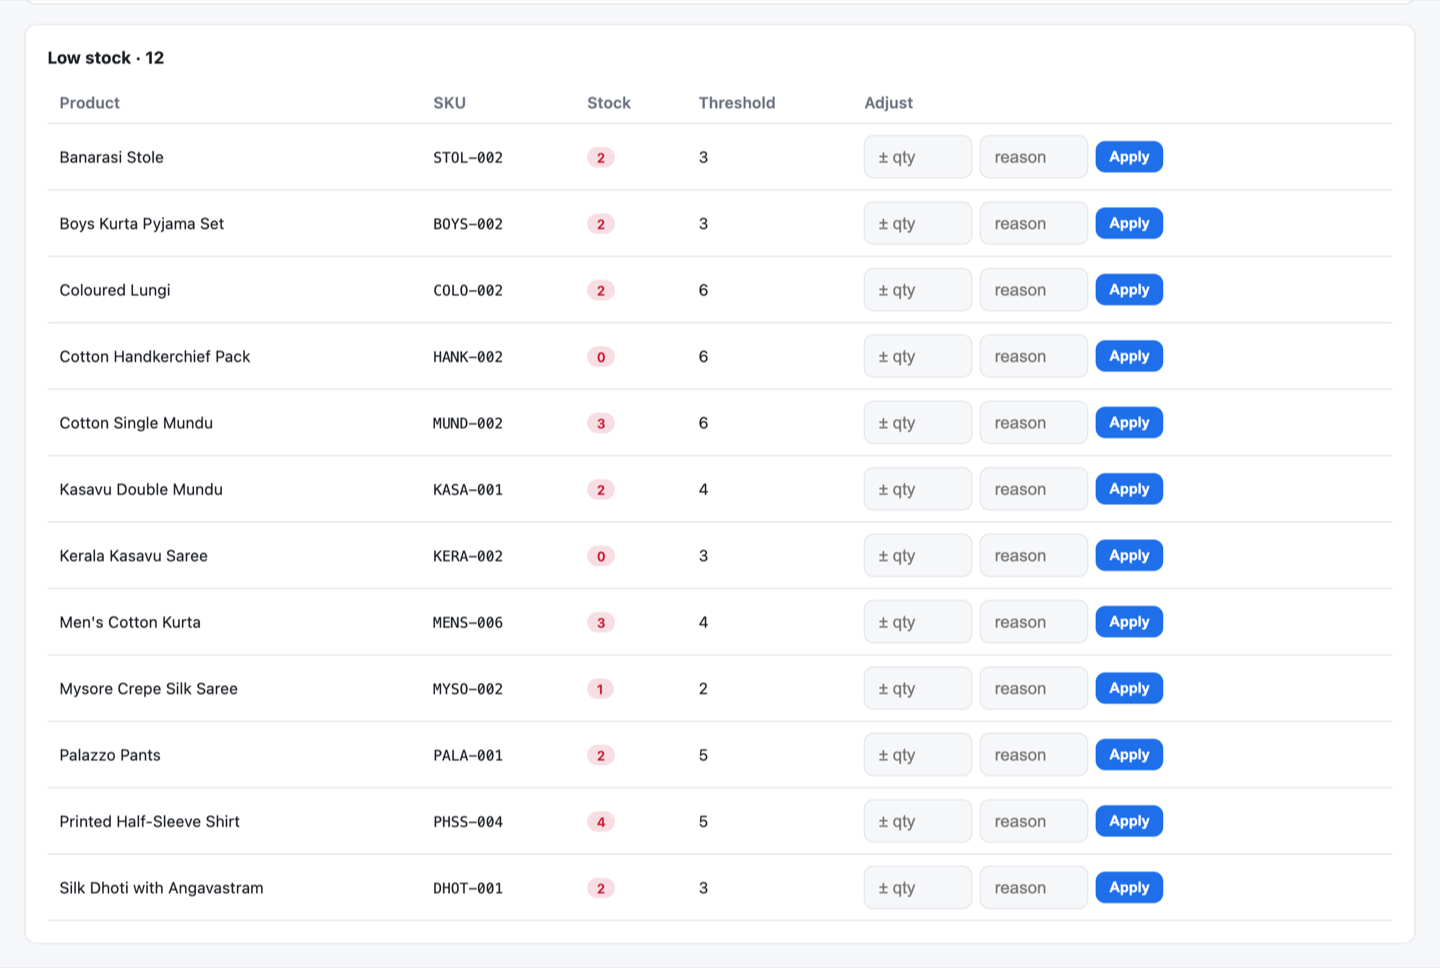
    The Low stock list: twelve items with their SKU code, stock, reorder threshold and a box to adjust the quantity with a reason.
    Every adjustment keeps its reason.

Good to know

  • Set each product’s reorder level with Reorder at in Catalogue.
  • On AI Pro, Suggested restock can fill a delivery for you. See Ask KadaAI.

All guides

At the counter

Till

Make your first sale

Keyboard first: F1 to search, F2 to pay, Enter to finish.

  1. Scan or search

    Scan the barcode and the item drops into the cart. No barcode? Type part of the name, move with ↑ ↓ and press Enter. F1 jumps back to search at any time.
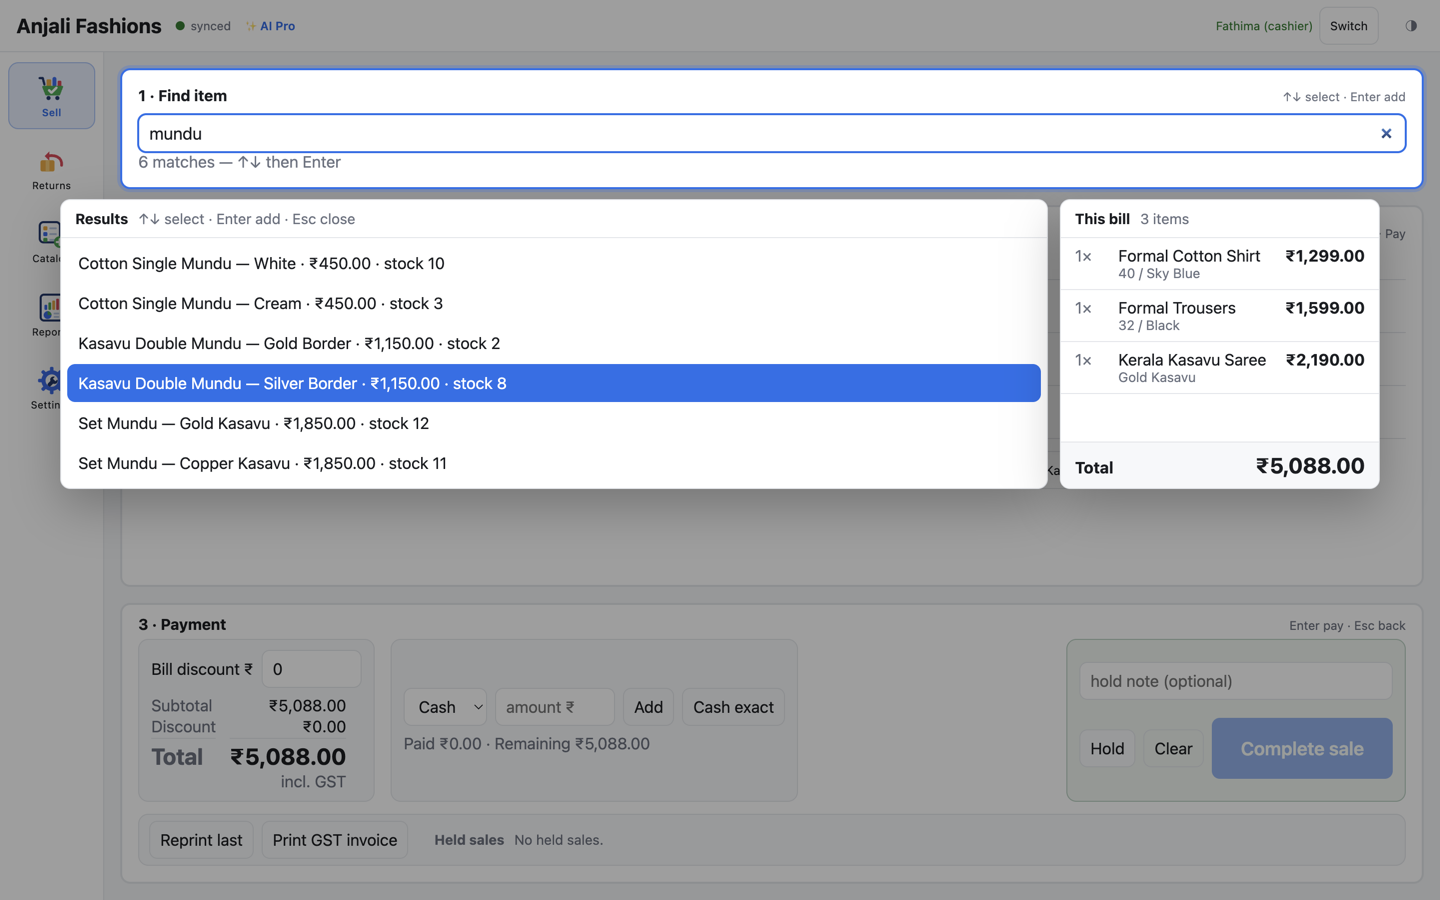
    The till’s sell screen with “mundu” typed in the search box: six matching sizes and colours with price and stock, one highlighted, and the bill so far on the right.
    Matches show every size and colour, with price and stock.
  2. Change quantity or discount

    Scan the same item again for two. Or edit Qty and Disc ₹ on the line; ✕ removes it. Bill discount ₹ takes money off the whole bill.
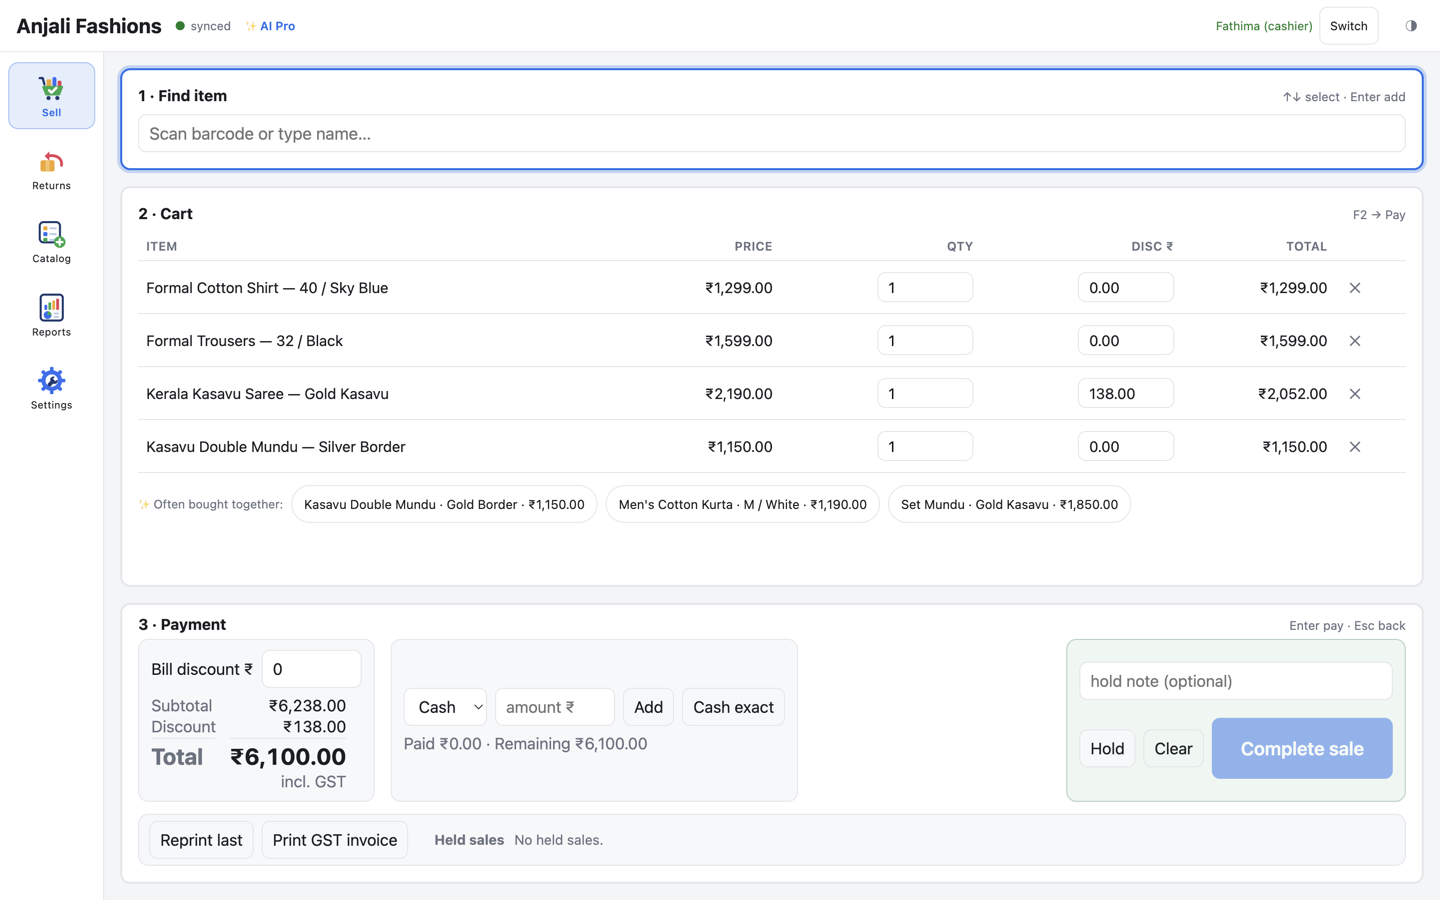
    The till’s billing screen with four items in the cart, one with a line discount, a bill total of ₹6,100 including GST, and suggestion chips for items often bought together.
    The cart, with a line discount on the saree.
  3. Go to payment

    Press F2, or Enter on an empty search box.

  4. Take the money

    Choose Cash, Card, UPI or Other, type the amount and press Enter. Leave the amount blank to take the rest of the bill.

  5. Split it if you need to

    Part on UPI and the rest in cash? Add one payment, then the other. The till works out the change.
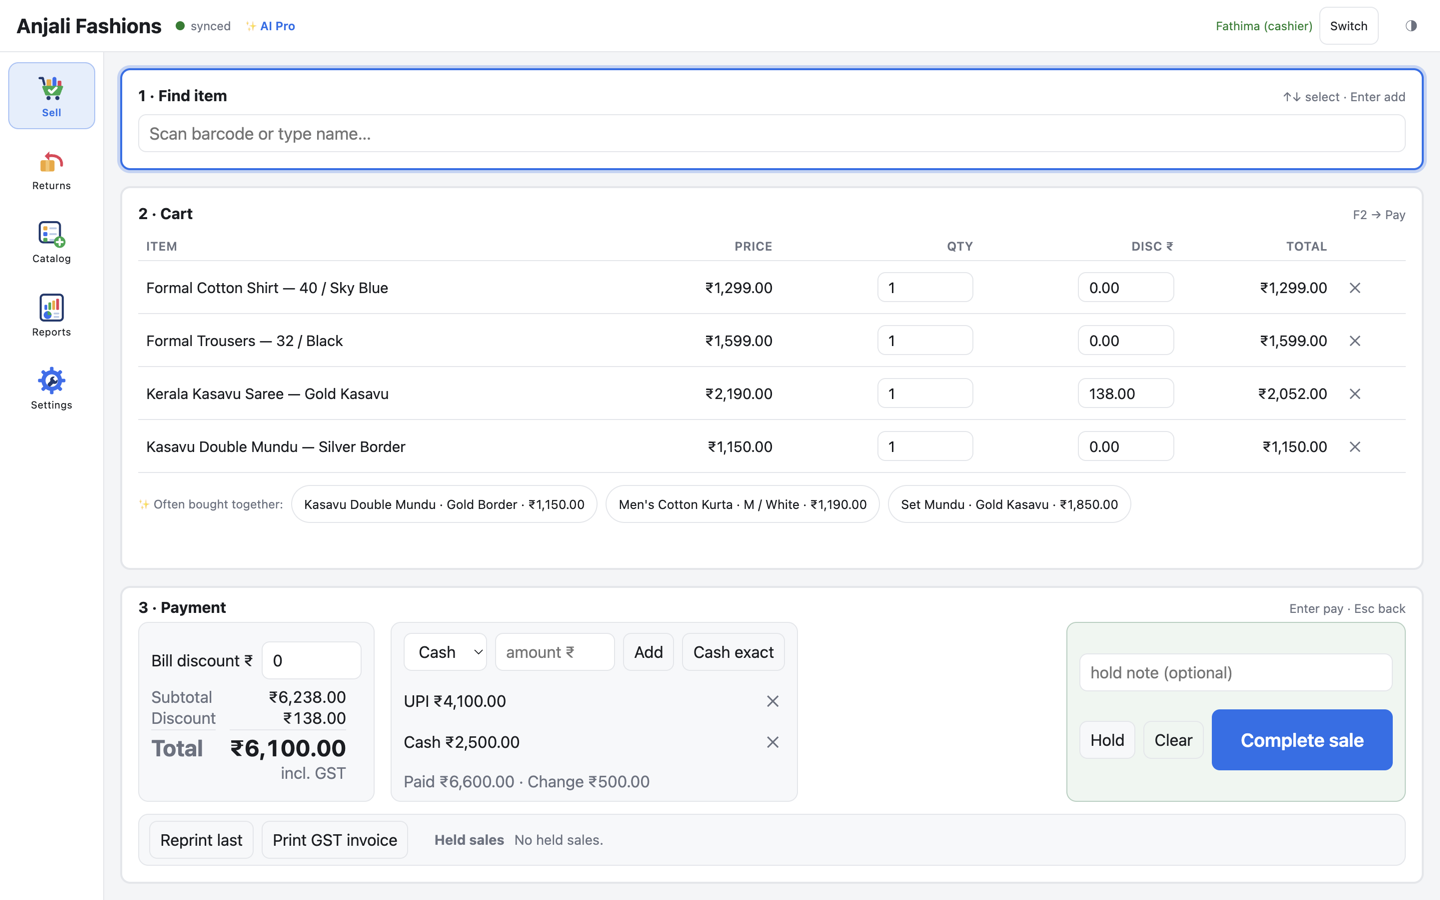
    The till’s payment panel with two payments, UPI and cash, adding up to more than the total, so the screen shows the change to give back, and the Complete sale button ready.
    UPI and cash on one bill, with the change worked out.
  6. Complete and print

    Press Enter on Complete sale. The receipt prints, and it is the tax invoice.
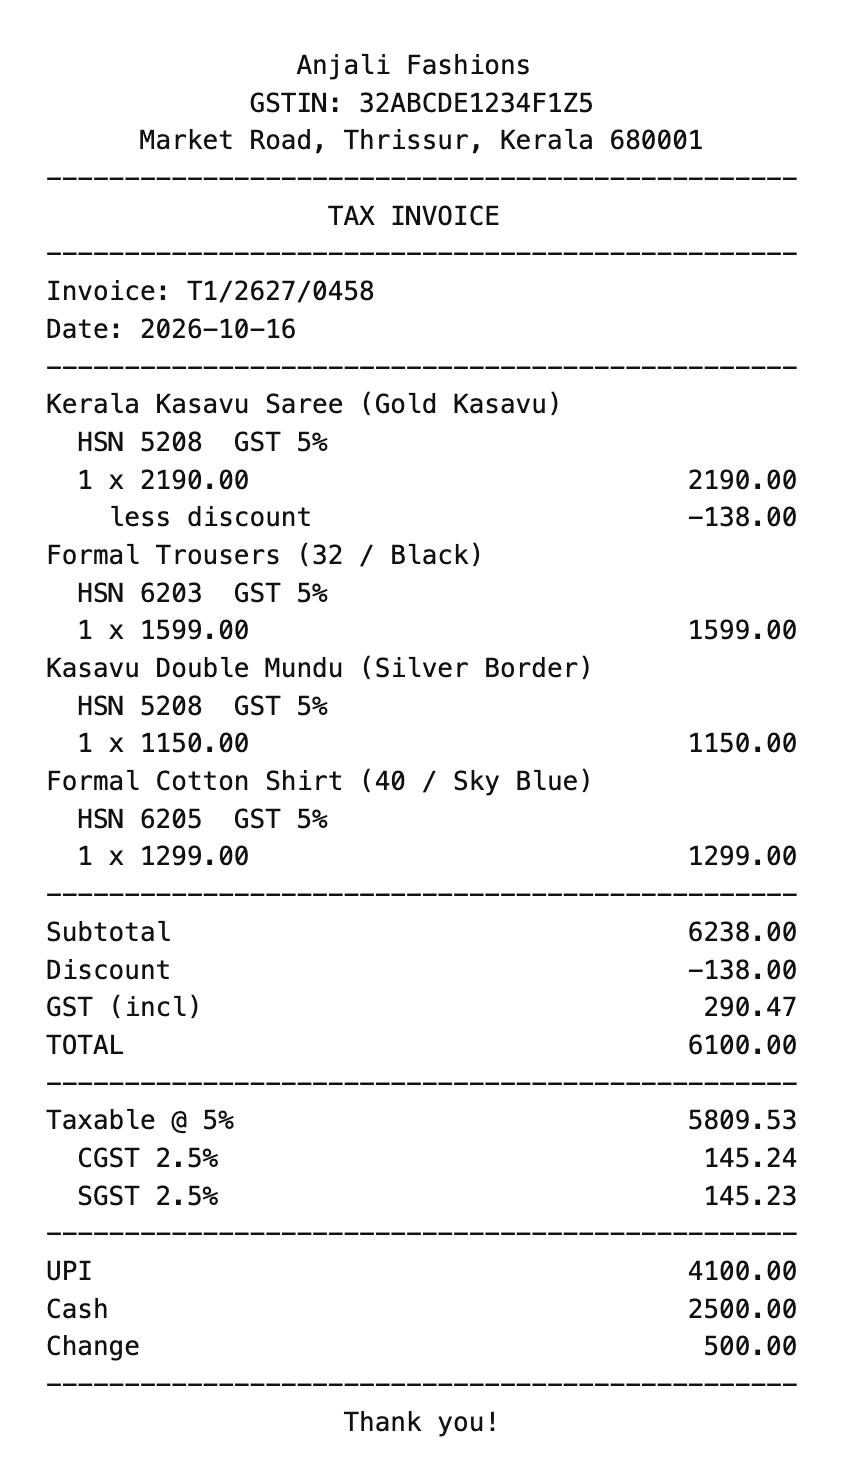
    The 80 mm receipt for that bill, titled TAX INVOICE: Anjali Fashions’ GSTIN and address, invoice number T1/2627/0458, four items each with its HSN code and 5% GST, the discount and total, taxable value with CGST and SGST at 2.5% each, and the UPI and cash payments with change.
    New The receipt is the tax invoice: the till’s own number, HSN and GST on each line, CGST and SGST.

Good to know

  • Cash exact fills in the exact cash amount in one click.
  • Reprint last prints the last receipt again; Print GST invoice prints an A4 tax invoice for it.
  • No thermal printer set up? The Windows print window opens instead, so you can use another printer or save a PDF. We set up thermal printers with you during onboarding.
  • On AI Standard and AI Pro, chips under the cart suggest items often bought together, learned from your last 90 days of bills. They use no AI requests.

All guides

Till

Hold and resume a sale

Customer gone to try another size? Park the bill and serve the next person.

  1. Add a note if you like

    Type a name or a reminder in hold note (optional).

  2. Press Hold

    The cart clears and the bill moves to Held sales.

    The till’s hold controls: a hold note box with Hold, Clear and Complete sale buttons, next to the bill totals, the payment row and the Held sales list.
    Hold parks the bill in Held sales.
  3. Serve the next customer

    Bill them as usual.

  4. Resume

    When the first customer is back, press Resume next to their bill in Held sales. If another sale is on screen, the till asks before replacing it.

  5. Or discard it

    Changed their mind? Press Discard.

Good to know

  • A held bill stays on the till where you held it.
  • Holding doesn’t set the stock aside.

All guides

Till

Take a return

Find the bill, choose what came back, refund. The credit note is made for you.

  1. Open Returns

    Choose Returns in the till’s left menu.

  2. Find the bill

    Under Find the original sale, type the bill number from the customer’s receipt and press Find sale.

  3. Choose the items

    Type how many of each item came back in Return qty. The till won’t let you return more than was sold.

  4. Choose the refund

    Pick Cash, Card, UPI or Other in Refund via. The refund updates as you go.
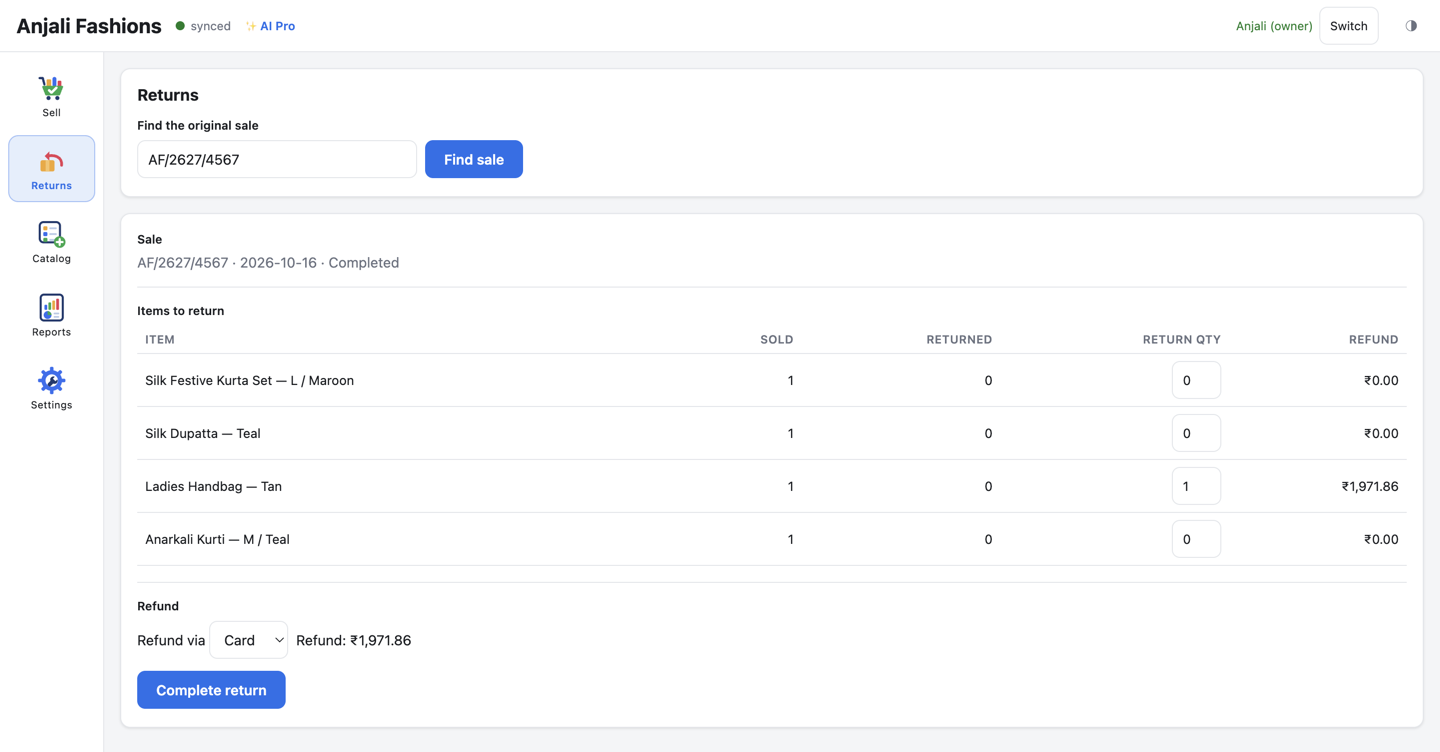
    The till’s Returns screen: a bill found by its number, four items with sold, returned and return quantity columns, one handbag marked for return, a card refund and a Complete return button.
    One item from a four-item bill, refunded to card.
  5. Complete the return

    Press Complete return. A credit note prints and the stock goes back on the shelf.

  6. See it in the web admin

    In Sales → Credit notes, every return is listed with its own number, the date, how it was refunded and the amount. Open one to see what came back and the GST reversed.
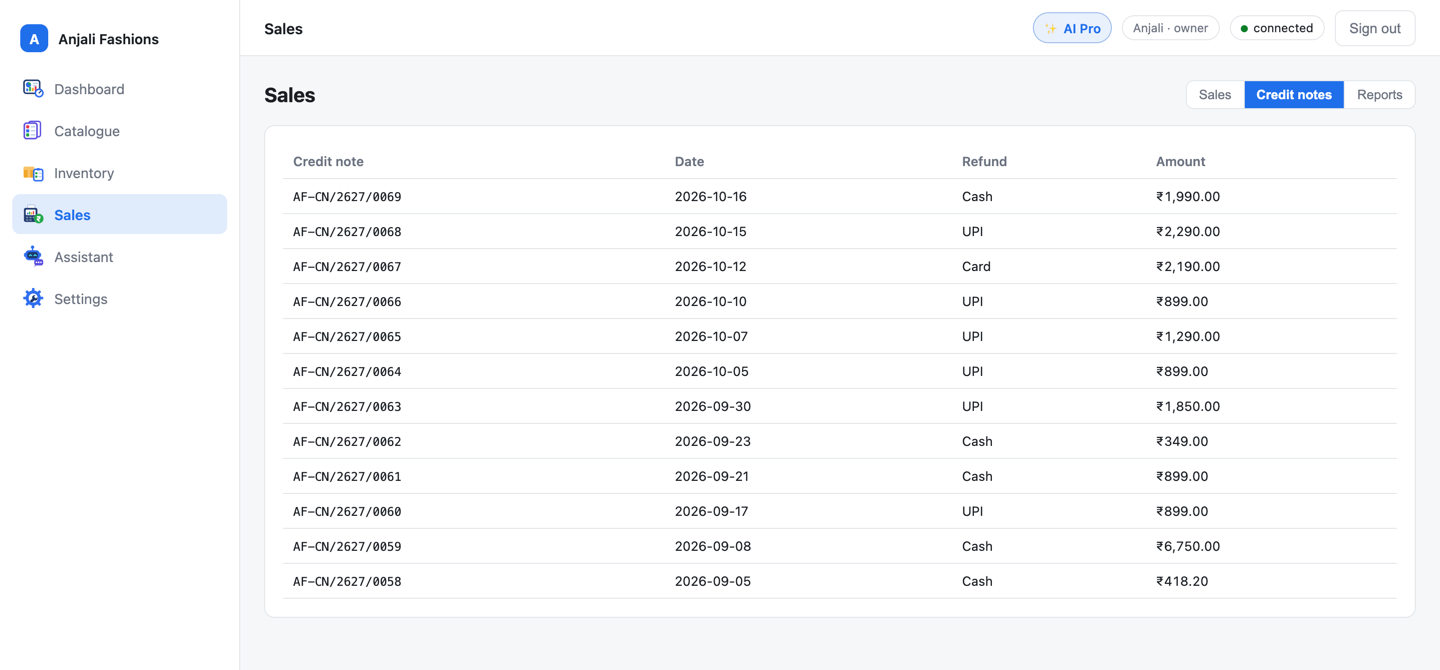
    The Credit notes list in the web admin: twelve credit notes, numbered in their own series, each with its date, refund method and amount.
    Credit notes have their own number series.

Good to know

  • Return part of a bill now and the rest later; KadaAI remembers what’s already back.
  • Cash refunds come off the expected cash at day-close by themselves.
  • The till finds its own bills straight away, and other tills’ bills once they’ve synced.

All guides

TillWeb adminOwner

Close the day

One number matters at closing time: the cash expected in the drawer.

  1. Open Reports on the till

    Signed in as an owner, choose Reports, then Day-close.

  2. Pick the day and press Run

    You see bills, takings, discounts, GST, expected cash and change given, then totals by payment method and by cashier.
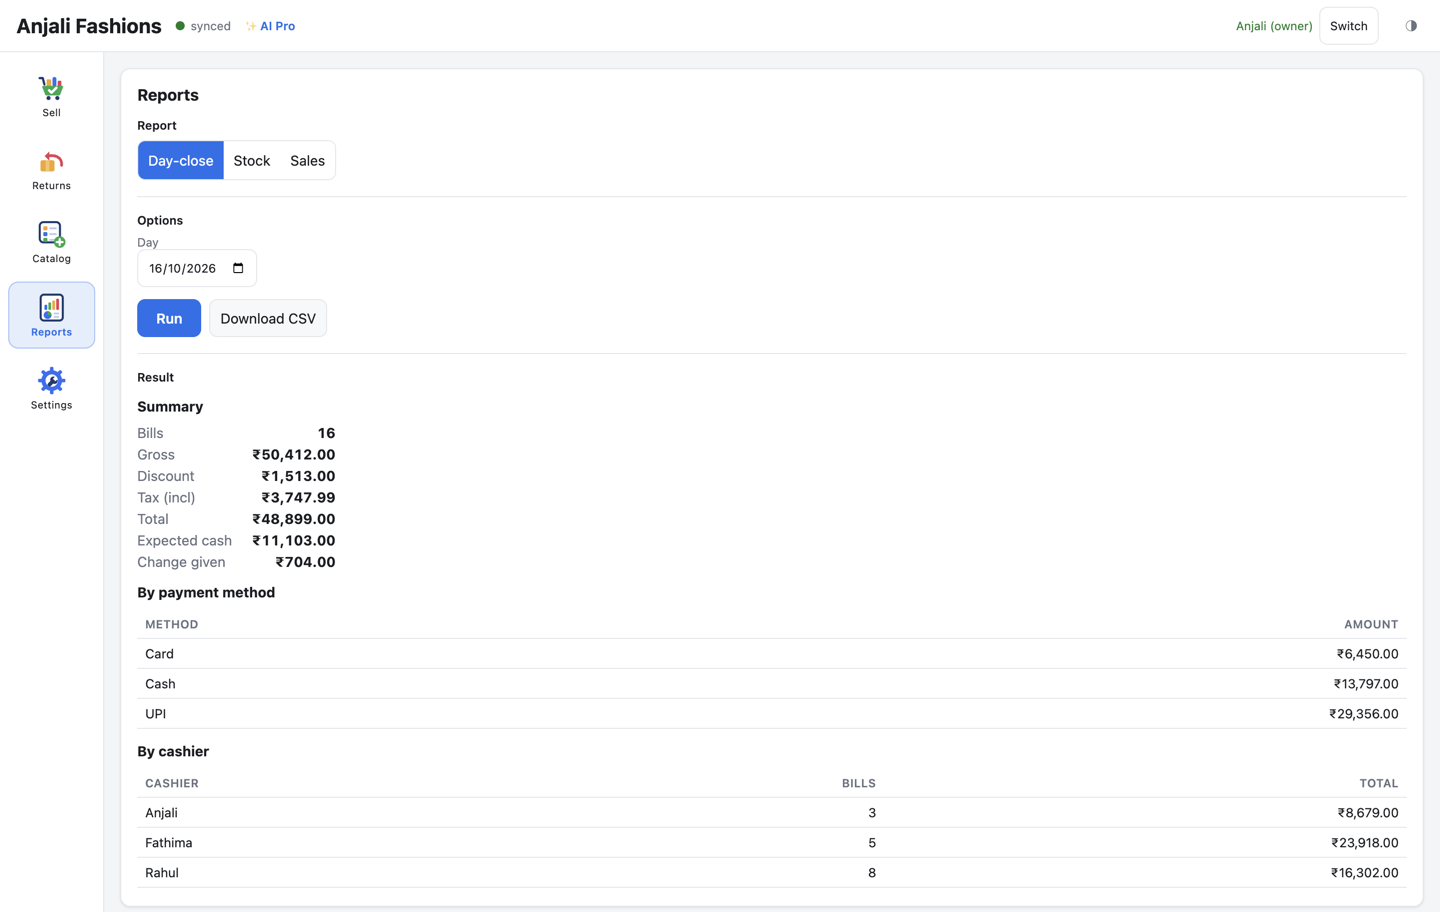
    The till’s Day-close report: a summary of bills, gross, discount, tax, total, expected cash and change given, then totals by payment method and by cashier.
    Card and UPI totals help you match the bank.
  3. Count the drawer

    Compare the cash in the drawer with Expected cash. It’s far easier to find a slip today than next week.

  4. Keep a copy

    Press Download CSV to save the report.

  5. Or check it from anywhere

    In the web admin, open Sales → Reports, choose Day-close (Z), pick the dates and press Run.
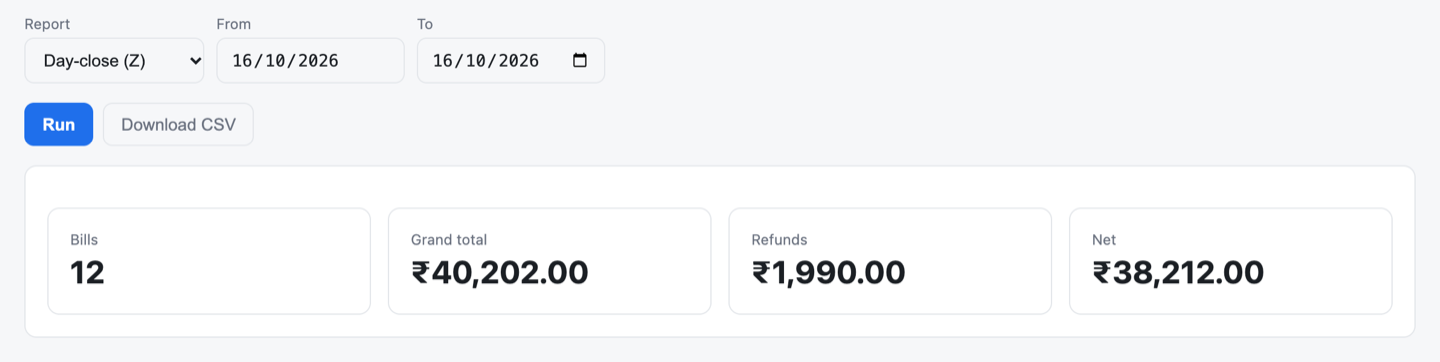
    The Day-close (Z) report in the web admin with today’s date: number of bills, grand total, refunds and net.
    The same day, from the web admin.

Good to know

  • Reports come from the server, so the till needs the internet to run them.
  • Expected cash is the cash you took, less change given and cash refunds.
  • A difference? Look for a sale rung up as cash but paid by card.
  • The web admin also has Sales, GST (GSTR-1) and Stock & valuation reports, each with CSV.

All guides

AI and settings

Web adminAI Standard · AI Pro

Ask KadaAI

AI reads your own sales and stock and answers in plain words. It lives in the web admin, and billing never depends on it.

  1. Read your insights

    On the Dashboard, pick Today, 7 days or 30 days. The AI insights card gives three to six plain points. Press Refresh for a fresh take.

    The AI insights card on the dashboard with four plain-language points: restock low and out-of-stock items, feature the top sellers, clear slow-moving stock and watch weekend sales.
    Example Insights from a demo store.
  2. Ask the AI Assistant

    Press the AI Assistant button at the bottom right, or open Assistant in the menu. Type a question like “What sold best this week?” and press Ask.
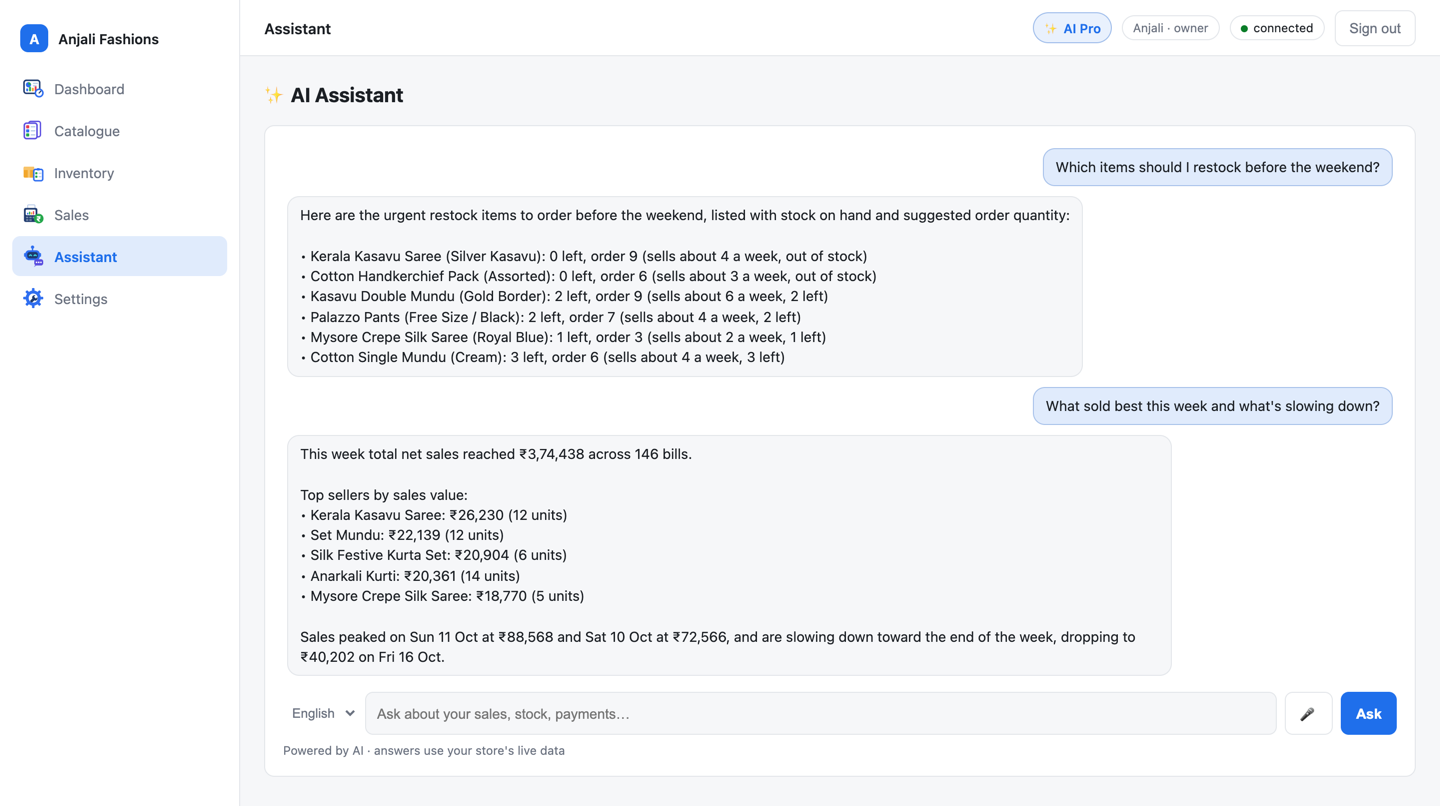
    The AI Assistant in the web admin answering two questions: which items to restock before the weekend, and what sold best this week.
    Example Answers from a demo store’s own sales and stock.
  3. Pick your language

    Choose English, Malayalam or Tamil for the answer. You can type Malayalam or Tamil in English letters. In Chrome or Edge, press the mic to ask by voice.

  4. Plan your restock (AI Pro)

    In Inventory, Suggested restock lists the 15 most urgent items for the next 2 weeks, learned from the last 28 days of sales. Press Add, or Prefill all, to put them into Receive stock.
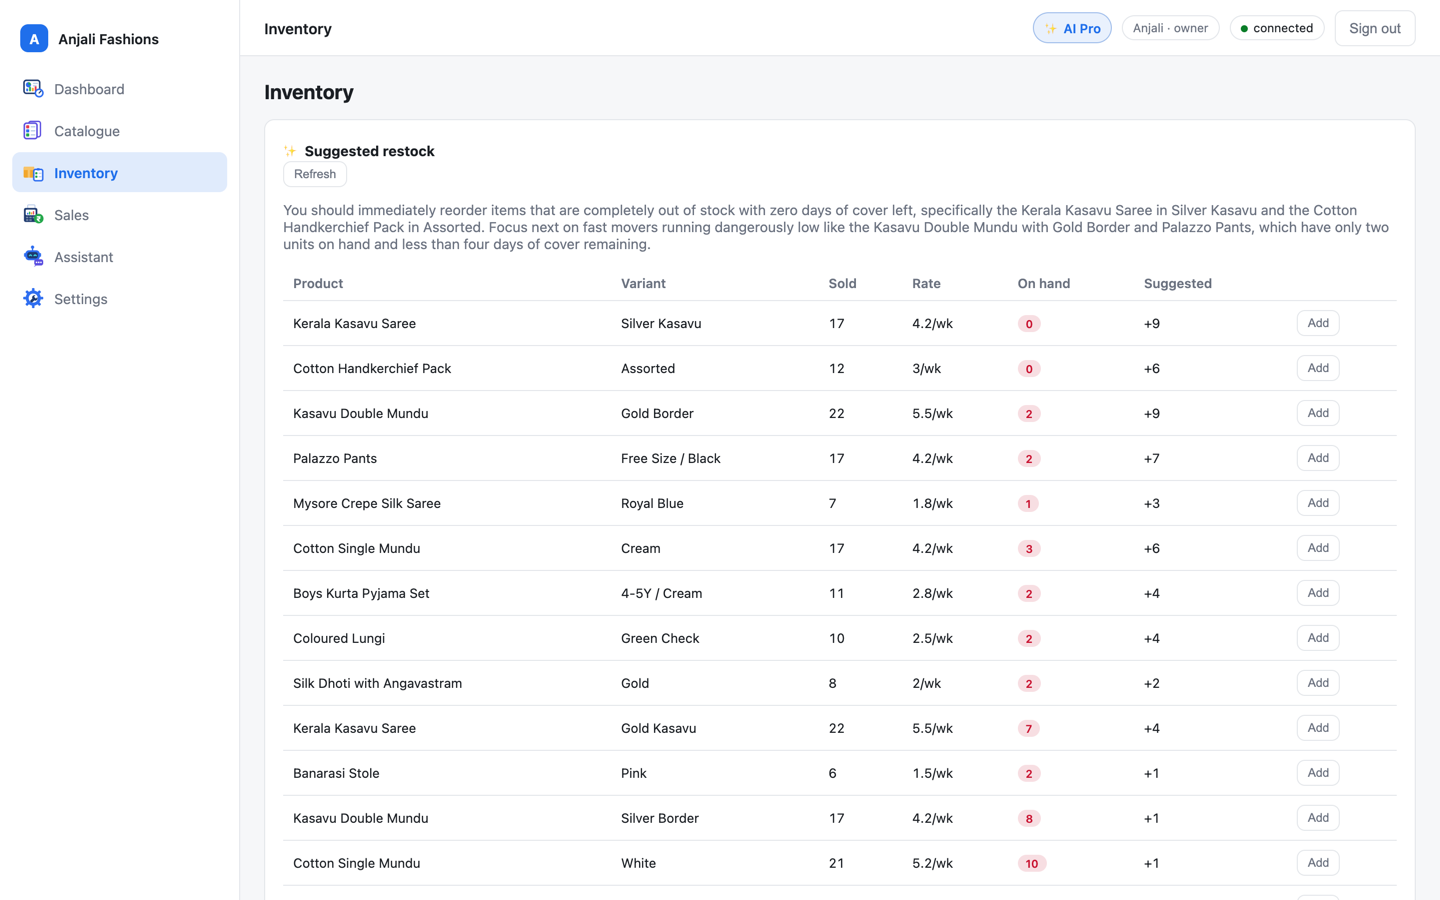
    The Suggested restock card in Inventory: a note on what to reorder first, then items with units sold, weekly sales rate, stock on hand and a suggested quantity, each with an Add button.
    Example A demo store’s restock list.

Good to know

  • Suggested quantities come from a formula based on each item’s sales rate and stock. The AI writes the note on what to reorder first.
  • AI Standard includes 1,000 AI requests a month and AI Pro 5,000.
  • AI needs the internet. If it’s down, the till keeps billing.
  • To answer, AI sends product names and sales totals to the AI provider. The Assistant is for owners.

All guides

Till

Make the till yours

Each till keeps its own look. Change it any time in Settings.

  1. Open Settings

    Choose Settings in the till’s left menu. Appearance is at the top.

  2. Theme and colour

    Pick Light or Dark, then one of 5 accent colours or any colour you like. The ◑ button in the top bar flips the theme too.

  3. Sell screen layout

    Search on top gives a wide search bar over the cart. Three columns puts find item, cart and payment side by side.
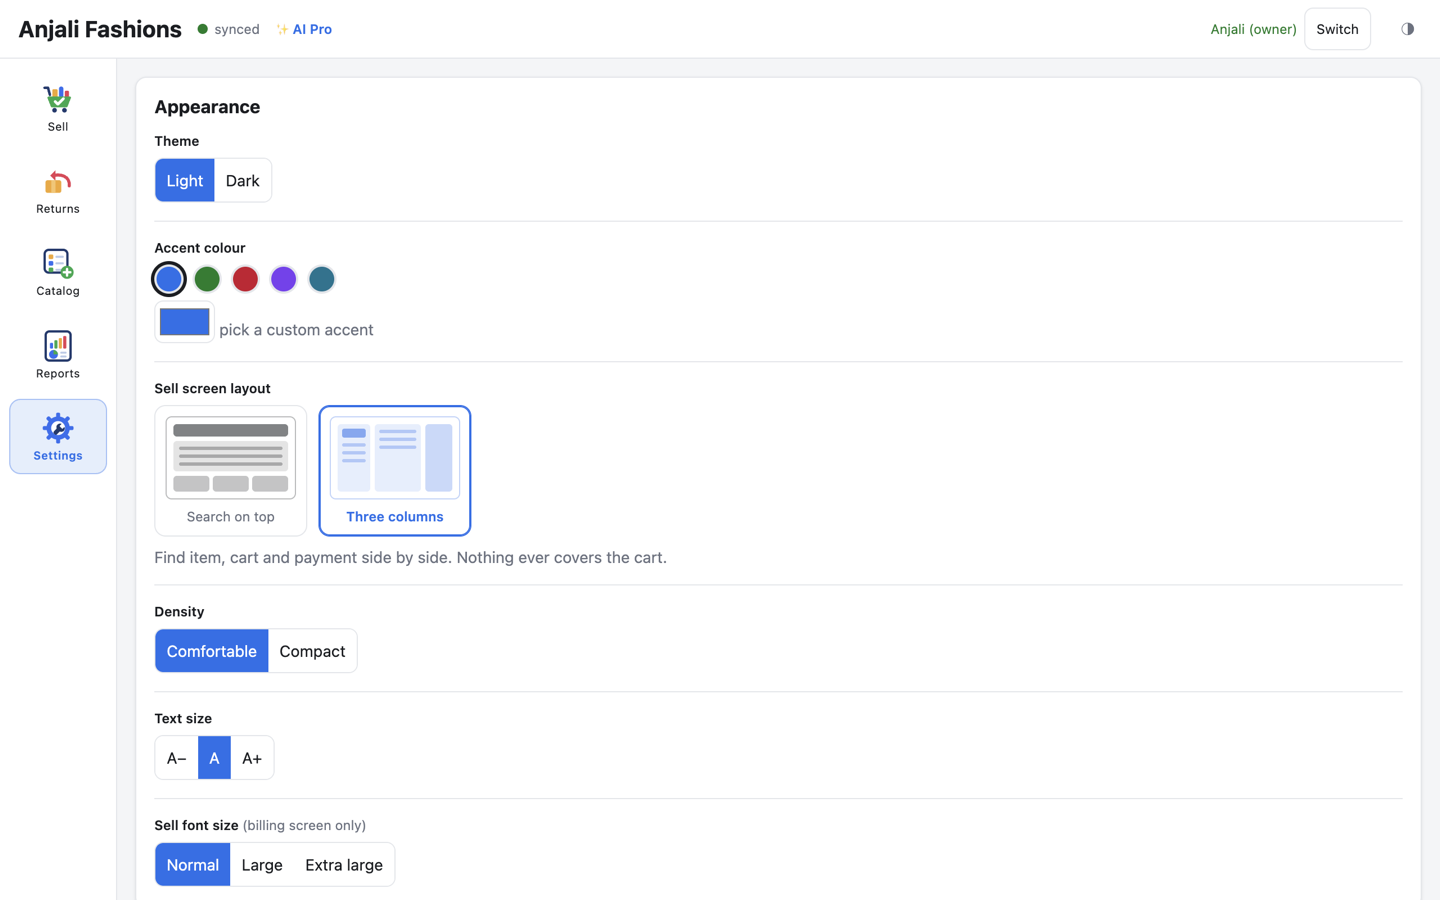
    The till’s Appearance settings: Light and Dark theme buttons, five accent colours and a custom colour, the Search on top and Three columns layouts, density, text size and sell font size.
    Theme, colour, layout and text size, per till.
  4. Density and text

    Choose Comfortable or Compact, a text size (A−, A, A+) and a Sell font size of Normal, Large or Extra large for the billing screen.

Good to know

  • Settings are saved on each till, so the counter by the door can look different from the one at the back.

All guides

Web adminOwner

See and revoke tills

Every counter has its own key. See each one, and switch off a lost one in one click.

  1. Open Settings → Tills

    Each till shows its name, whether it’s Online or Offline, when it last synced and when it was paired.
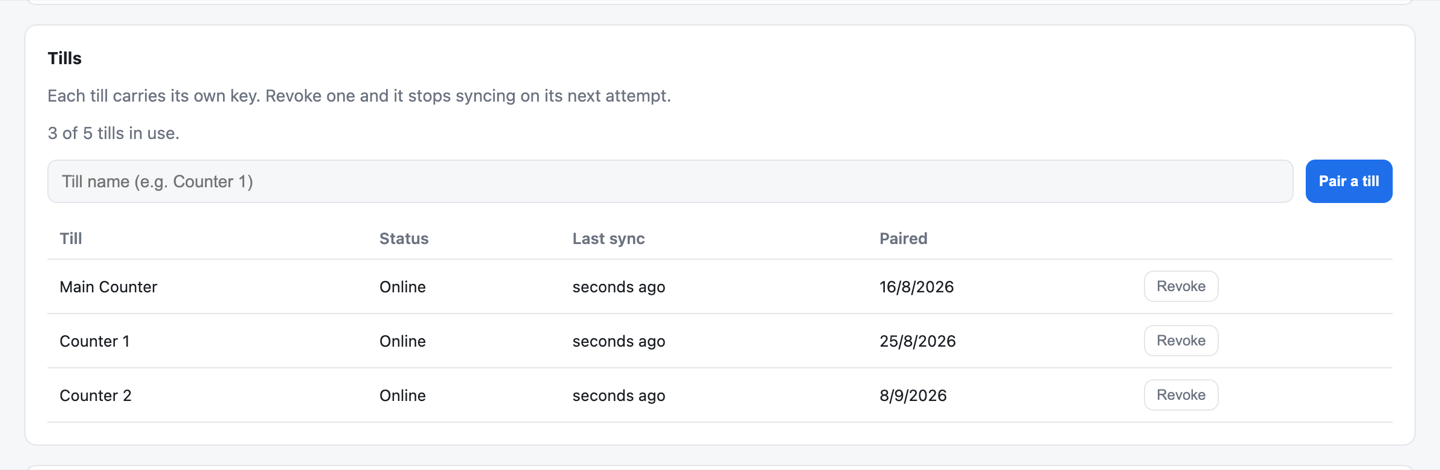
    The Tills list in web admin settings: three tills named Main Counter, Counter 1 and Counter 2, all online, last synced seconds ago, with their pairing dates and a Revoke button for each.
    Every till, and when it last synced.
  2. Revoke a lost till

    Press Revoke and confirm. The till stops syncing on its next attempt, and its key no longer works.

  3. Pair the replacement

    Pair the new PC from its own Setup screen. See Install and pair a till.

Good to know

  • A store can have as many tills as it needs, unless your plan sets a limit. Revoking frees a place.
  • Name tills after where they sit, so the right one is easy to find.

All guides

Till

When the internet drops

Keep billing. Every sale is saved on the till first.

  1. Check the light

    The status at the top of the till turns amber when it can’t reach the server.

    The till’s top bar while the internet is down, with an amber status light.
    Offline: the status light turns amber.
  2. Keep selling

    Scan, take payment and print as usual. Prices, GST and sign-in all work offline.
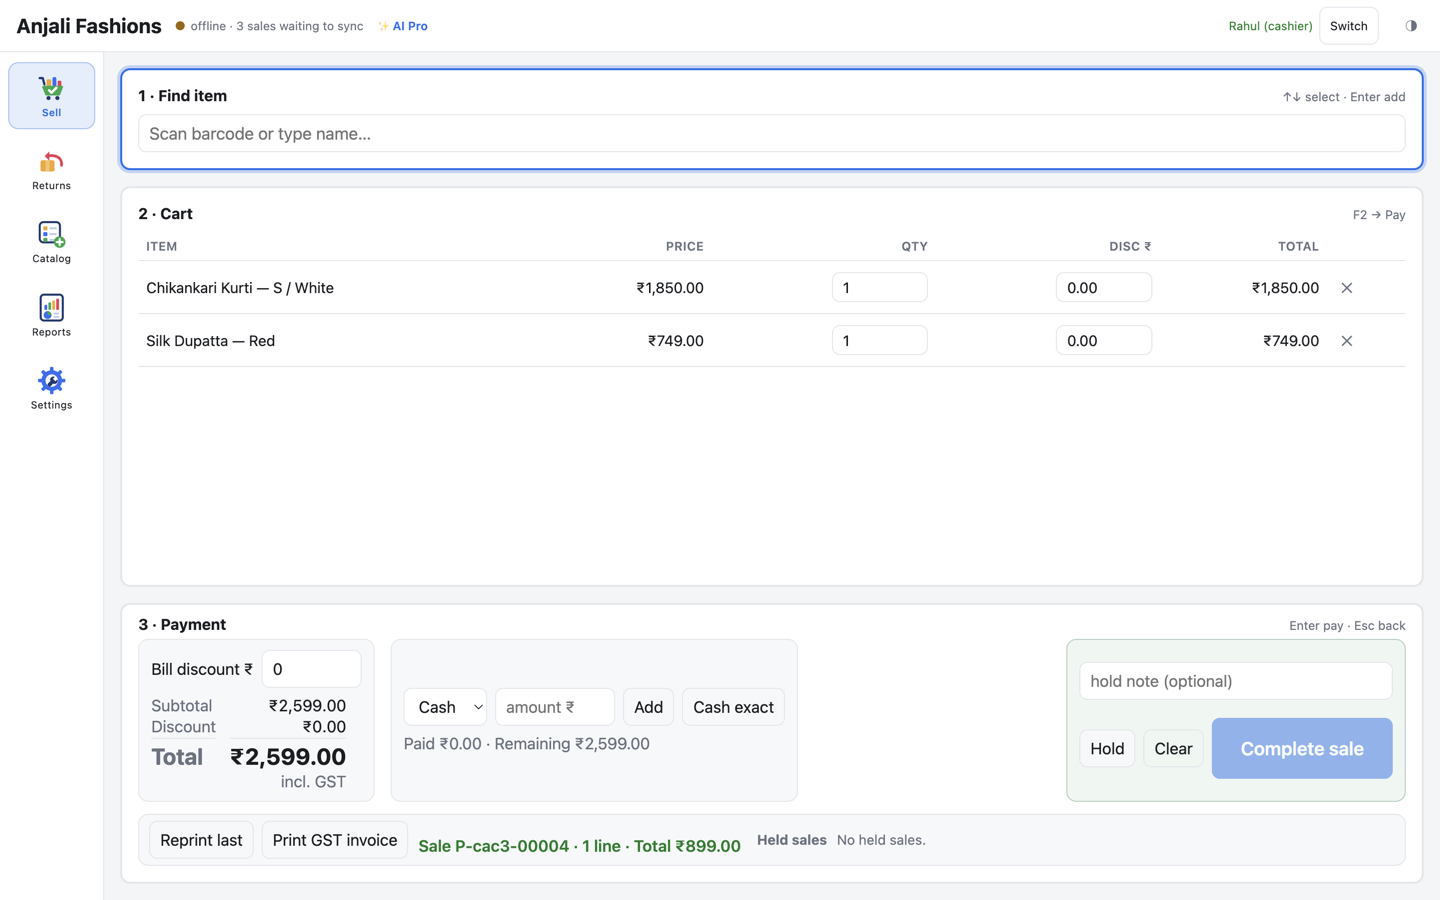
    The till’s sell screen while offline: the amber status at the top and two items in the cart, billed as usual.
    Billing carries on while the internet is down.
  3. Let it catch up

    When the connection is back, the waiting sales go up by themselves and the light turns green: synced.

    The till’s top bar back online: a green light and the word synced.
    Back online and synced.

Good to know

  • Online, the till syncs every 15 seconds, so a sale shows in your web admin within about 15 seconds.
  • Nothing is double-counted, and sales are never silently lost.
  • Owner reports, CSV import, add-on chips and AI need the internet.
  • Want to send now? Settings → Sync → Sync now. A red light means something needs a person: open Settings → Sync and message us.
  • How local-first sync works

All guides

We’re here to help

Stuck on a step? Message us.

We’ll help you through it, from pairing your first till to closing your first day.

Or write to hello@kadaai.in